This post is a part of the Manitou Hills Project series.
It is a bit tricky to build an energy budget for an off grid home. It requires much more planning than with a typical home, as one has to figure out all of the details in advance. At the beginning of the planning process, I made a list of all of the electricity that we could expect to use, and then followed that up with trying to make sure that all purchase decisions would fit into that energy budget. As I mentioned in a past post, the one significant mistake we made was to have a heating system that required electricity to run - it wouldn't be much for a typical house, but is tough for an off grid house in the winter.
It is currently much more expensive to generate energy off the grid than to buy grid power, so one has to be very careful to make everything as efficient as possible. If we were connected to the local utility, Hydro-Quebec, our electricity rates would be less than $.10/kWh, some of the cheapest power available anywhere in the world. However, with our backwoods location, generating our own power was the only viable option. When I estimate the cost and expected lifetime of all of our solar panels, electronics, batteries, backup generator, etc., our power cost will end up being much closer to $1/kWh, at least 10 times the cost of grid power. This means that economizing and conserving is the only way to keep the total cost of power reasonable.
Below I have attached a fairly accurate version of our energy budget updated to account for our first full year of use of our home. At all times we run a refrigerator, an HRV, the solar electronics, and a few other electronics that make up our internet and security systems. In the winter, the boiler also runs nearly every day to keep the house heated. On top of that, we have pretty bare bones usage of power as compared to a typical home, and I've done my best to reduce the vampire loads down to almost nothing.
Our total electricity usage for the past year was a bit less 1500 kWh, which makes an average of roughly 4 kWh/day. Our 1500 kWh of electricity usage is
dwarfed by the typical household in Canada, which uses an average of 11,900 kWh (32.6 kWh/day). While our place is extremely efficient, I
must make clear that one of the reasons our usage is so low is that
we are only in the house a bit less than half of the time, as work
and other responsibilities call us into the city far more often than I
would like. If one factors in the power that we use in our rental in the
city, we still are below average, but not by all that much. We are striving to reduce our energy consumption, especially of non-renewable energy, but it is a task that takes time to accomplish.
One other disclaimer to make is that our electricity usage still makes up significantly less than half of our total energy use. The technology is simply not yet available (at any sort of reasonable price) to heat a house through a cold, gray, and snowy Canadian winter with solar power alone. Propane and/or wood are an absolute necessity to be able to stay warm out in the countryside. With the fast dropping prices of solar, batteries, as well as improved building envelopes and heating technologies like air to air heat pumps, this may become a possibility a decade or two down the road, but the time is not yet ripe.
Tuesday, 24 November 2015
Thursday, 12 November 2015
Generating power off the grid
This post is a part of the Manitou Hills Project series.
For better or worse, the property that my wife and I fell in love with was over a mile back down a private road, and our few other neighbors have summer-only cabins. There are no services of any kind that come down our road, no phone, no cable, no fiberoptics, and of course, no power lines. The neighbors heat with wood when needed, and handle cooking and a small amount of power generation with propane. I looked briefly into bringing power lines back to our site, but an off grid solution became the obvious choice when I realized that the price would greatly exceed $100,000 just to put in the power poles. I already had quite an interest in sustainable energy and solar power, so this provided just the impetus that I needed to pursue an off grid home.
I'll list the vital statistics of our system first, and then say a bit about how the system has worked so far, as well as the updates that have already been implemented.

Our electricity generating system:
Photovoltaic panels: 12 Solarworld 235 watt panels (2820W in total)
Additional panels (fall of 2015): 12 Jinko 250 watt panels (3000W total)
Batteries: 8 Deka Deep cycle solar batteries, lead acid AGM 12V 265 Ah (a nominal 25 kWh storage)
Backup generator: Generac Ecogen, 6 kW
Electronics:

How the pieces fit together
Any electrical grid starts with power generation, and ours is no different. The majority of the time, all of our electricity needs are supplied by solar panels. However, there are times when the panels can't produce enough power (at night and on cloudy days) when it is needed. Generally the batteries serve the role of storing enough energy to get us through a couple of days without much sun. When the battery charge gets too low, the backup propane generator turns on, sending power into the house via an alternator to be used both to power the house and recharge the batteries.
The electronics provide for energy transformations and communications. The charge controller takes high voltage power coming from the solar panels, and steps it down so that just the right amount and voltage (a bit over 48V DC) of power is passed on to the other systems. Most of this power is dumped straight into the batteries, which chemically store that electricity for later use. When power is needed for loads in the house, that 48V power coming from the batteries and charge controller is drawn into the inverter, which converts the power into the normal household power found in any home, 120V alternating current, which goes out through a standard breaker panel to the house. The inverter is actually an inverter/charger, so in addition to taking DC power from the batteries and solar panels out to the house, it can also convert AC power from the generator (or for others' setups, the power grid) into DC power to charge the batteries. The Automatic Generator Starter is able to start the generator whenever the battery voltage falls below a certain level, ensuring that the batteries are never discharged too deeply. Finally the Combox provides an interface for controlling all of the other devices, as well as being able to connect to the internet, which I use to check the system remotely and send regular system status updates by email to myself.
Solar panel orientation
There is a simple rule of thumb that I learned from our solar installer when we were discussing our system setup, with the best orientation for stationary panels being due south, with an angle equal to one's latitude on Earth. This maximizes the annual output of power from a given solar panel. We are at 45° north, so we ought to set our panels at the same angle to the ground. For our original panels, we were able to get this orientation, due south and at a 45° angle.
Through our first winter, I realized that there are some nuances to an off grid system in the northcountry that aren't captured by that rule of thumb. There are two main problems with following this rule. The first is snow. It turns out that panels set at 45° don't shed snow as well as I'd hoped. The snow will clear after a day or so of sunny weather, but while the snow is still there, no power is produced. Clearing them manually works fine, but we are not always there to do it. The second problem is that an off grid home is not in the business of producing the maximum total power over the year, it is about always having enough power available to keep the house running. Our summer power loads are extremely low, as no heating is needed, days are long and so little lighting is needed, and we are outside much more often. In the winter, when there is already less sun, our electricity needs are actually much higher.
These two problems have a shared solution, to set solar panels at a much steeper angle. This allows snow to shed off very easily, and squares the panels much better to the low angled winter sun. Of course it is possible to get around this problem with such things as seasonably adjustable solar panels, or the significantly more complicated sun tracking systems, but the simplicity (and reduced cost) of fixed panels is quite attractive. I would go so far as to say that if one is going to have stationary panels in the northern US or Canada on an off grid home, that orienting them for the winter is the best path to follow.
In our first two winters, we were overly reliant on our (poorly functioning) generator through the winter, and so earlier this fall, we added just such an upgrade, an additional solar array set at an angle of 65° from the ground. These should greatly reduce the amount of run-time that will be needed from the generator in future winters. As you can see from the picture below, the new panels also are turned a bit to the south-west, which is intentional. There is a better clearing in the trees toward the west, and so the new panels are turned a bit so that they will be receiving direct sun for a greater portion of the day.

Power generation through the year
Finally, I've attached the power production estimate that my solar installer created for me prior to installing the system. While a few details changed after these estimates were made, there is an incredible wealth of data here about our local solar resource, expected consumption of power at our home, the efficiencies of the various components of an off grid power system, and more. For any readers who may actually be considering building an off grid system, this is the sort of nitty gritty details that you will need to consider.
For better or worse, the property that my wife and I fell in love with was over a mile back down a private road, and our few other neighbors have summer-only cabins. There are no services of any kind that come down our road, no phone, no cable, no fiberoptics, and of course, no power lines. The neighbors heat with wood when needed, and handle cooking and a small amount of power generation with propane. I looked briefly into bringing power lines back to our site, but an off grid solution became the obvious choice when I realized that the price would greatly exceed $100,000 just to put in the power poles. I already had quite an interest in sustainable energy and solar power, so this provided just the impetus that I needed to pursue an off grid home.
I'll list the vital statistics of our system first, and then say a bit about how the system has worked so far, as well as the updates that have already been implemented.

Our electricity generating system:
Photovoltaic panels: 12 Solarworld 235 watt panels (2820W in total)
Additional panels (fall of 2015): 12 Jinko 250 watt panels (3000W total)
Batteries: 8 Deka Deep cycle solar batteries, lead acid AGM 12V 265 Ah (a nominal 25 kWh storage)
Backup generator: Generac Ecogen, 6 kW
Electronics:
- Schneider MPPT 80 600 Charge Controller
- Schneider Conext SW 4048 Inverter/Charger
- Schneider Combox
- Schneider Automatic Generator Starter

How the pieces fit together
Any electrical grid starts with power generation, and ours is no different. The majority of the time, all of our electricity needs are supplied by solar panels. However, there are times when the panels can't produce enough power (at night and on cloudy days) when it is needed. Generally the batteries serve the role of storing enough energy to get us through a couple of days without much sun. When the battery charge gets too low, the backup propane generator turns on, sending power into the house via an alternator to be used both to power the house and recharge the batteries.
The electronics provide for energy transformations and communications. The charge controller takes high voltage power coming from the solar panels, and steps it down so that just the right amount and voltage (a bit over 48V DC) of power is passed on to the other systems. Most of this power is dumped straight into the batteries, which chemically store that electricity for later use. When power is needed for loads in the house, that 48V power coming from the batteries and charge controller is drawn into the inverter, which converts the power into the normal household power found in any home, 120V alternating current, which goes out through a standard breaker panel to the house. The inverter is actually an inverter/charger, so in addition to taking DC power from the batteries and solar panels out to the house, it can also convert AC power from the generator (or for others' setups, the power grid) into DC power to charge the batteries. The Automatic Generator Starter is able to start the generator whenever the battery voltage falls below a certain level, ensuring that the batteries are never discharged too deeply. Finally the Combox provides an interface for controlling all of the other devices, as well as being able to connect to the internet, which I use to check the system remotely and send regular system status updates by email to myself.
Solar panel orientation
There is a simple rule of thumb that I learned from our solar installer when we were discussing our system setup, with the best orientation for stationary panels being due south, with an angle equal to one's latitude on Earth. This maximizes the annual output of power from a given solar panel. We are at 45° north, so we ought to set our panels at the same angle to the ground. For our original panels, we were able to get this orientation, due south and at a 45° angle.
Through our first winter, I realized that there are some nuances to an off grid system in the northcountry that aren't captured by that rule of thumb. There are two main problems with following this rule. The first is snow. It turns out that panels set at 45° don't shed snow as well as I'd hoped. The snow will clear after a day or so of sunny weather, but while the snow is still there, no power is produced. Clearing them manually works fine, but we are not always there to do it. The second problem is that an off grid home is not in the business of producing the maximum total power over the year, it is about always having enough power available to keep the house running. Our summer power loads are extremely low, as no heating is needed, days are long and so little lighting is needed, and we are outside much more often. In the winter, when there is already less sun, our electricity needs are actually much higher.
These two problems have a shared solution, to set solar panels at a much steeper angle. This allows snow to shed off very easily, and squares the panels much better to the low angled winter sun. Of course it is possible to get around this problem with such things as seasonably adjustable solar panels, or the significantly more complicated sun tracking systems, but the simplicity (and reduced cost) of fixed panels is quite attractive. I would go so far as to say that if one is going to have stationary panels in the northern US or Canada on an off grid home, that orienting them for the winter is the best path to follow.
In our first two winters, we were overly reliant on our (poorly functioning) generator through the winter, and so earlier this fall, we added just such an upgrade, an additional solar array set at an angle of 65° from the ground. These should greatly reduce the amount of run-time that will be needed from the generator in future winters. As you can see from the picture below, the new panels also are turned a bit to the south-west, which is intentional. There is a better clearing in the trees toward the west, and so the new panels are turned a bit so that they will be receiving direct sun for a greater portion of the day.

Power generation through the year
Finally, I've attached the power production estimate that my solar installer created for me prior to installing the system. While a few details changed after these estimates were made, there is an incredible wealth of data here about our local solar resource, expected consumption of power at our home, the efficiencies of the various components of an off grid power system, and more. For any readers who may actually be considering building an off grid system, this is the sort of nitty gritty details that you will need to consider.
Thursday, 5 November 2015
Heating systems for our home - and some lessons learned
Being a newcomer to living off of the grid, I did not make the best initial choice for our heating system. In order to help others to not make the same mistakes, I'll both lay out what we did and how it was problematic, as well as how we went about fixing the problems for the future.
What we installed initially
We installed a hydronic heating system powered by a propane fired boiler (a Trinity LX150). The system has a heated concrete floor in the lower level with four zones (one for each bedroom and one for the bathroom), and two hydronic baseboard registers in the upstairs. This system provides amazingly warm and comfy floors in the bedrooms when we run the heating system. Some people with heated floors don't get to have the warm foot experience that often with high efficiency homes, but this has not been the case for us. As the house is used primarily as a weekend retreat in the winter, we turn up the heat considerably when we first arrive. We have to wear warm sweaters when we first get in the door, but then have a full day where the floor is toasty warm.

The secondary heating system, and the one that I enjoy using much more, is a free standing wood stove, a Jotul F3CB to be precise. It is a relatively small (42,000 btu) high efficiency stove out of Norway, but it is more than sufficient for our well-insulated home. The stove is located in the open concept upstairs, and in just a few hours it can take the 1000 square foot high ceiling space from sweater temperatures to shorts weather.

We have only one full winter of usage to measure our consumption of propane and wood, so it is difficult to draw big conclusions from it, but the usage was about what was expected. In the 12 months up to November of 2015, we burned 400 gallons of propane across all uses, primarily for heating the house, but also for domestic hot water, the backup generator, and a propane range in the kitchen. My best guess is that 75% of that, perhaps 300 gallons of propane, went to space heating. For the wood stove, we burned just a bit less than a cord of wood last winter, and had a fire in the stove during at least part of the day during most every day that we were there last winter.

The problems associated with the first effort
The big problem with our heating system was that it was relatively complex and brittle. We aren't there all the time to run the wood stove, meaning that the boiler system really needed to carry the load. The problem with this is that the system requires a constant, and quite significant, supply of electricity at the time of year when it is most difficult to generate power from the PV system. Running full power, the heating system requires approximately 400W for the boiler and circulation pumps, meaning that if it runs for 10 hours per day (which can happen on the coldest days of winter), the heating system alone needs 4 kWh/day, which is almost the full amount of our target daily electricity budget. The other problem is that the hydronic system is sensitive to freezing, which occurred during last winter (our first full winter). We lost power last winter and had a few frozen water pipes, as well as a break in one of the hydronic heating lines. There was glycol in the mix as an antifreeze, but apparently the installer did not put enough. It did take a very serious set of combined circumstances to bring down the house, consisting of it being the coldest week of the year when we were away for a week visiting family at Christmas, with several snowy days covering the solar panels and preventing power generation, and the final straw of the backup generator breaking down.
Steps taken to make the house resilient going forward.
So we have no desire to repeat the emergency situation that we found ourselves in for a good chunk of last winter, and have taken quite a number of steps in service of making our home more resilient in the face of future mechanical problems. I plan to discuss some of these steps more thoroughly in a future post, so I'll just highlight briefly here those that aren't heat related. What did we do?
-Set the house to send daily emailed status reports giving conditions of the solar system, including power generated, power used, generator run time, battery temperature. These daily reminders tell me how the system is functioning, and I know that if I fail to receive one, that there is a problem with either the power or internet systems.
-Increase the amount of solar panels. During the first winter, the generator was needed relatively frequently over a 6 month period from the fall through the spring, and it was far too often for my taste. Therefore, we doubled the capacity of the solar system.
Finally, we added a new backup heat source that would not be dependent on either our being there every day or electricity. We did this by using an older, simpler technology - a direct vent propane wall heater. These have been used for many years in garages, workshops, cabins in the woods, as well as in quite a number of off grid homes. If I had done more research about off grid heating, or if I had had better advice, I may have decided to handle all of our heating needs with a couple of these heaters from the beginning. The biggest advantage of these units is that they require no electricity at all to function. They have a pilot light and a milli-volt thermopile thermostat, which uses a temperature gradient to produce the small amount of current needed for the thermostat, and they rely on convection to circulate air past the heating elements. We have installed one to provide for some of the base load of heating, as well as to ensure that the house would never freeze again regardless of any issues with the electrical system.
How to size this new heater? I relied on the boiler company to help make this decision with the original heating system, but this new installation was a much more hands on endeavor for me. We have the good fortune of having a good energy model of our house, needed for the LEED certification (to be discussed in a future post). This shows an estimate of 33,200,000 BTUs of heat needed per year for the whole house, which is about a 70% reduction over a similar sized house built only to code. Heaters are generally rated as per the BTUs/hour that they produce. To get a first approximation of our heating needs, we take the heating load for the year, divide by 100 days to account for the heaviest part of the heating season, divide by 24 hours in a day to account for a heater running full time, which gives:
$$\frac{33,200,000 \ BTU}{1 \ year}*\frac{1 \ year}{100 \ days}*\frac{1 \ day}{24 \ hours}=13,800 \ BTU/hr$$
This calculation would be assuming that we heat the entire house to 70 degrees (20 degrees Celsius) with just the wall unit for the entire winter. In actuality, we will keep a lower set-point, and this unit will instead keep just a local area of the house at about 65 to 70 degrees, while allowing the rest of the house to be cooler when we aren't there, and continuing to be heated by the hydronic system. This calculation is just an estimate of the average heating load, so this amount of heat wouldn't be able to keep up with heating the whole house on the coldest days of winter. We selected the Empire DV215 heater, a 15,000 BTU unit, which sits in the central bedroom, radiating heat out to the rest of the lower level. We shall see in the coming winter how the upgraded heating system works out.
Update March 11, 2016.
Winter is now on the run, and I can report that the wall heater was an amazing success in terms of reliability and reducing the use of electricity with our heating. The heater was able to carry essentially all of the heating load for the house during the weekdays when we were often in the city. The heater was placed in the kids' bedroom, and set to around 68 degrees. Upon our arrival after a few days away, the adjacent rooms were always 60 degrees or warmer, and the upstairs was always warmer than 50 degrees. From a starting point like this it was quite easy to turn up the boiler, start a fire in the woodstove, and be down to shirtsleeves within no more than 2 hours.
One other new (more like forgotten and found again) fact is that our energy evaluation also included a calculation of peak heating loads for the home and boiler system, which actually end up matching quite closely to the calculation I did above. The HERS calculation of peak heating load for our house is 23,400 BTU/hour, which including the caveats that I mention above, is relatively close. This 23,400 number is the amount of heat that would be needed to keep up on the coldest days of the year, not the typical winter day that I tried to estimate for. This peak load calculation also showed our actual boiler specification, with a max heat output of 136,000 BTU. This is nearly 6 times our maximum heating load and is majorly overkill, but I have heard time and again that heating and cooling contractors usually overbuild these systems, and our house does require a much smaller heating load than the standard home.
Thursday, 29 October 2015
Our building envelope
This post is a part of the Manitou Hills Project series.
When first looking at how much insulation to put into the house, I looked to the Passive House certification system. To get Passive House certification, there is a hard limit on the amount of energy needed to heat and cool a space of 15 kWh/m² per year, which works out to about 1/10th the amount that a typical house uses. It turns out that this is a very difficult bar to meet in cold climates, with the amount of insulation required being simply immense. With a house like ours it would have required walls roughly 2 feet thick (instead of the 6-8" that are typical of current construction. After doing a bit of math, it didn't seem like this was an investment that would ever pay off, so instead we only took inspiration from the Passive House ideals, rather than attempting to meet them. We still ended up with a wall assembly roughly 15" thick, trying to balance cost and efficiency.

Another heuristic that I picked up from our architect is the 60-40-30-20 rule. This suggests putting R-60 insulation in the ceiling, R-40 in above grade walls, R-30 in basement walls, and R-20 underneath the basement slab, which is much closer to what we actually did. I've elsewhere heard referred of concepts similar to this, labeled as "the pretty good house". While a house like this won't reach that Passive House standard, it will still cut by half or two thirds the amount of energy needed to heat and cool a home.

For those of you familiar with reading building plans, I have put up the final house plan with all building details, here. These seem to not often be shared, but I am not too concerned about someone copying our home; if you would like to borrow any details, please do so.
Starting from the top, we built a cathedral ceiling using a single pitched shed-style roof. We used manufactured trusses with 3' of depth built in for insulation. Into this space a layer of 3.5" Roxul batt insulation was laid down covering the entire bottom of the ceiling cavity. Loose cellulose insulation was then blown in above, mostly filling the 3' space, reaching an estimated R-80 for the ceiling. It was originally specified to be R-60, but there was enough space for more insulation, and cellulose is relatively cheap and easy to install, so a last minute upgrade was done during installation. With the energy modeling that we did after the house was complete, it turns out that the R-60 would have been sufficient, as only a very small proportion of the heat loss would have been through the roof even with R-60. Beneath the rest of the insulation was a standard polyethylene air and vapor barrier, preventing air movement and controlling water movement. The final interior layer is veneer plywood sheets that make for a very attractive ceiling to the room below.
For the above-grade walls, we ended up using a double stud wall assembly. The structure of the house is built with 2x8 lumber, which allowed both for necessary support on the tall wall in the upstairs, as well as to give a deep space for insulation. The bays in this wall were filled with Roxul batt insulation, a mineral wool product. Mineral wool is a quite well regarded insulation, as it is very pest, water, and fire resistant, is easy to install, and holds its shape well, all leading to good long service. On the inside of this 2x8 wall is the polyethylene air/vapor barrier. Inside of that is a 2x4 utility wall, holding all of the electrical, plumbing, and data cabling. This wall is also insulated with Roxul insulation. Finally, a standard layer of sheetrock provides the interior walls. A big advantage of the utility wall is that all of the openings that need to be cut, for outlets, fixtures, etc., don't need to punch holes in the air barrier, keeping the air tightness higher. Outside of the 2x8 wall, there is a layer of plywood, then 1.5" of Roxul comfortboard, which is very similar to the batt insulation we used, but a firmer and coming in sheets. By wrapping all the walls in mineral wool, it prevents thermal bridging, where heat would pass through the wood framing (which is a poor insulator compared to the insulation it holds in place). Finally, the exterior has 1x3 wooden strapping to allow for air circulation and water drainage, on which Hardie brand cement board is mounted. Altogether these walls are a nominal R-47.
For the below grade walls, which are about 5-6' tall around two sides of the walkout basement, the final assembly was a simpler one. From the outside, there was a 2" thick layer of rigid EPS (expanded polystyrene) foam, with a 4' wide skirt of the same material buried approximately one foot below the outside ground surface. This skirt reduces the ability of cold winter temperatures from passing through the soil to reach the lower walls and foundation of the house. Essentially, the cold is slowed down as it has to go through or around that skirt. Inside of the 2" of foam, there is a waterproof membrane stuck to an 8" thick poured concrete wall. Inside of the concrete wall is another layer of 4" EPS foam, with the polyethylene barrier to the inside. The final layer is the same 2x4 utility wall mentioned above, covered by drywall. This total assembly measures R-40.

Underneath the basement concrete slab is 4" inches of rigid foam, giving R-16. A couple other finishing details really help to reduce the basement heating loads. First, the basement concrete slab is actually encased on 3 sides by foam, coming down from the walls, and then with the foam underneath - it essentially looks like a foam 'bathtub'. This significantly reduces thermal bridging, making the diffusion of heat into the ground or concrete walls slower.
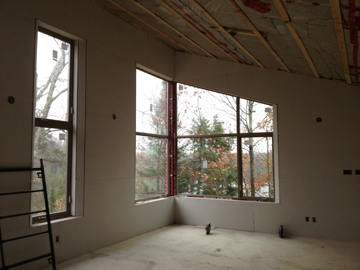
All the windows in the house have fiberglass frames, are triple paned with argon fill, and have an insulating value of roughly R-5. The windows facing south are all chosen to allow in more of the sun's heat (called solar heat gain coefficient, SHGC), whereas windows facing all other directions have a low SHGC. The difference between them is that the high gain windows allow in approximately 50% of the sun's heat, whereas the low SHGC windows let in only about 30%. The interesting thing about passive solar design is that much of the heating load is carried by the heat coming in the windows, with energy modeling suggesting that about 30% of the house's total heat needs are being provided by the sun shining through the windows.

The final thing that always needs to be mentioned when discussing a building envelope is air-tightness. There used to be ideas floating around that a house needed to 'breathe', but these ideas have long since been discredited, and high quality builders now look to build houses as tightly as possible, then actively bring in fresh air with a device like a heat recovery ventilator (HRV). Airtightness is meaured in air changes per hour (ACH), which measures the total volume of air inside a building, and how many times in one hour that this much air would be replaced when a home is slightly depressurized with a big fan. Old leaky homes may have a number like 10 ACH (or even much higher), meaning that the air inside is replaced by outside air about 10 times each hour when depressurized. Passive house rules require .6 ACH. Our house, with the polyethylene barrier mentioned multiple times above, measured at 1.47 when the house was half done, the outer 2x8 wall in place with the air barrier. The house is probably much tighter than that now that the utility wall, sheetrock, paint, and caulking are all in place, but we never quite got around to getting a second measurement after the house was complete.
Another way to get a feeling for how this house is put together would be to watch this time lapse video of the day a crane was used to put up the walls and set the ceiling trusses in place (video created by our builder Stephane Charette of Bala Structures - he is the one singing as well).
Other building assemblies
I must say that there is a lot of interesting work going on by high-efficiency builders trying out quite a lot of ways to build very high efficiency homes that are simpler and cheaper. Even now, less than 2 years after our house was completed, there are already some things that we could change to simplify and make cheaper the house that we built. A lot of this sort of work shows up at the Green Building Advisor website, which I have become a frequent reader of. One other example comes from Ecohome, where our LEED certifier Mike Reynolds works. Their recent Edelweiss House is significantly more efficient than our home, and was also cheaper to build, as they did it with only a standard 2x6 wall and lots of exterior insulation. Needless to say, though the house that we have built is a very good one, there are many good ways to put together a high performance building envelope.
When first looking at how much insulation to put into the house, I looked to the Passive House certification system. To get Passive House certification, there is a hard limit on the amount of energy needed to heat and cool a space of 15 kWh/m² per year, which works out to about 1/10th the amount that a typical house uses. It turns out that this is a very difficult bar to meet in cold climates, with the amount of insulation required being simply immense. With a house like ours it would have required walls roughly 2 feet thick (instead of the 6-8" that are typical of current construction. After doing a bit of math, it didn't seem like this was an investment that would ever pay off, so instead we only took inspiration from the Passive House ideals, rather than attempting to meet them. We still ended up with a wall assembly roughly 15" thick, trying to balance cost and efficiency.

Another heuristic that I picked up from our architect is the 60-40-30-20 rule. This suggests putting R-60 insulation in the ceiling, R-40 in above grade walls, R-30 in basement walls, and R-20 underneath the basement slab, which is much closer to what we actually did. I've elsewhere heard referred of concepts similar to this, labeled as "the pretty good house". While a house like this won't reach that Passive House standard, it will still cut by half or two thirds the amount of energy needed to heat and cool a home.

For those of you familiar with reading building plans, I have put up the final house plan with all building details, here. These seem to not often be shared, but I am not too concerned about someone copying our home; if you would like to borrow any details, please do so.
Starting from the top, we built a cathedral ceiling using a single pitched shed-style roof. We used manufactured trusses with 3' of depth built in for insulation. Into this space a layer of 3.5" Roxul batt insulation was laid down covering the entire bottom of the ceiling cavity. Loose cellulose insulation was then blown in above, mostly filling the 3' space, reaching an estimated R-80 for the ceiling. It was originally specified to be R-60, but there was enough space for more insulation, and cellulose is relatively cheap and easy to install, so a last minute upgrade was done during installation. With the energy modeling that we did after the house was complete, it turns out that the R-60 would have been sufficient, as only a very small proportion of the heat loss would have been through the roof even with R-60. Beneath the rest of the insulation was a standard polyethylene air and vapor barrier, preventing air movement and controlling water movement. The final interior layer is veneer plywood sheets that make for a very attractive ceiling to the room below.
For the above-grade walls, we ended up using a double stud wall assembly. The structure of the house is built with 2x8 lumber, which allowed both for necessary support on the tall wall in the upstairs, as well as to give a deep space for insulation. The bays in this wall were filled with Roxul batt insulation, a mineral wool product. Mineral wool is a quite well regarded insulation, as it is very pest, water, and fire resistant, is easy to install, and holds its shape well, all leading to good long service. On the inside of this 2x8 wall is the polyethylene air/vapor barrier. Inside of that is a 2x4 utility wall, holding all of the electrical, plumbing, and data cabling. This wall is also insulated with Roxul insulation. Finally, a standard layer of sheetrock provides the interior walls. A big advantage of the utility wall is that all of the openings that need to be cut, for outlets, fixtures, etc., don't need to punch holes in the air barrier, keeping the air tightness higher. Outside of the 2x8 wall, there is a layer of plywood, then 1.5" of Roxul comfortboard, which is very similar to the batt insulation we used, but a firmer and coming in sheets. By wrapping all the walls in mineral wool, it prevents thermal bridging, where heat would pass through the wood framing (which is a poor insulator compared to the insulation it holds in place). Finally, the exterior has 1x3 wooden strapping to allow for air circulation and water drainage, on which Hardie brand cement board is mounted. Altogether these walls are a nominal R-47.
For the below grade walls, which are about 5-6' tall around two sides of the walkout basement, the final assembly was a simpler one. From the outside, there was a 2" thick layer of rigid EPS (expanded polystyrene) foam, with a 4' wide skirt of the same material buried approximately one foot below the outside ground surface. This skirt reduces the ability of cold winter temperatures from passing through the soil to reach the lower walls and foundation of the house. Essentially, the cold is slowed down as it has to go through or around that skirt. Inside of the 2" of foam, there is a waterproof membrane stuck to an 8" thick poured concrete wall. Inside of the concrete wall is another layer of 4" EPS foam, with the polyethylene barrier to the inside. The final layer is the same 2x4 utility wall mentioned above, covered by drywall. This total assembly measures R-40.

Underneath the basement concrete slab is 4" inches of rigid foam, giving R-16. A couple other finishing details really help to reduce the basement heating loads. First, the basement concrete slab is actually encased on 3 sides by foam, coming down from the walls, and then with the foam underneath - it essentially looks like a foam 'bathtub'. This significantly reduces thermal bridging, making the diffusion of heat into the ground or concrete walls slower.
All the windows in the house have fiberglass frames, are triple paned with argon fill, and have an insulating value of roughly R-5. The windows facing south are all chosen to allow in more of the sun's heat (called solar heat gain coefficient, SHGC), whereas windows facing all other directions have a low SHGC. The difference between them is that the high gain windows allow in approximately 50% of the sun's heat, whereas the low SHGC windows let in only about 30%. The interesting thing about passive solar design is that much of the heating load is carried by the heat coming in the windows, with energy modeling suggesting that about 30% of the house's total heat needs are being provided by the sun shining through the windows.
The final thing that always needs to be mentioned when discussing a building envelope is air-tightness. There used to be ideas floating around that a house needed to 'breathe', but these ideas have long since been discredited, and high quality builders now look to build houses as tightly as possible, then actively bring in fresh air with a device like a heat recovery ventilator (HRV). Airtightness is meaured in air changes per hour (ACH), which measures the total volume of air inside a building, and how many times in one hour that this much air would be replaced when a home is slightly depressurized with a big fan. Old leaky homes may have a number like 10 ACH (or even much higher), meaning that the air inside is replaced by outside air about 10 times each hour when depressurized. Passive house rules require .6 ACH. Our house, with the polyethylene barrier mentioned multiple times above, measured at 1.47 when the house was half done, the outer 2x8 wall in place with the air barrier. The house is probably much tighter than that now that the utility wall, sheetrock, paint, and caulking are all in place, but we never quite got around to getting a second measurement after the house was complete.
Another way to get a feeling for how this house is put together would be to watch this time lapse video of the day a crane was used to put up the walls and set the ceiling trusses in place (video created by our builder Stephane Charette of Bala Structures - he is the one singing as well).
Other building assemblies
I must say that there is a lot of interesting work going on by high-efficiency builders trying out quite a lot of ways to build very high efficiency homes that are simpler and cheaper. Even now, less than 2 years after our house was completed, there are already some things that we could change to simplify and make cheaper the house that we built. A lot of this sort of work shows up at the Green Building Advisor website, which I have become a frequent reader of. One other example comes from Ecohome, where our LEED certifier Mike Reynolds works. Their recent Edelweiss House is significantly more efficient than our home, and was also cheaper to build, as they did it with only a standard 2x6 wall and lots of exterior insulation. Needless to say, though the house that we have built is a very good one, there are many good ways to put together a high performance building envelope.
Building site and orientation

Forest surrounds the home on all sides, with amazing views of a small valley to the south, and a back bay of the river visible about 150' to the west of the house. We chose a hilltop location, in large part because of the views it afforded. The other advantages of this location are excellent southern exposure for both passive and active solar, as well as it being much less buggy than the surrounding lowland areas, due to it being drier and windier. That wind is a double-edged sword, however, as we are much more exposed to the whipping winds of storms and winter, which probably increase our heating loads a bit and have also put me in place to watch trees topple over and land within 20' of the house during a particularly vicious summer storm.
The clearing that we opened was just large enough to build the house and yard, a bit less than half of an acre. On the north, west and south sides of the house, this means that the forest begins only 20' from the house. To the southeast is a grassy yard big enough to cover the septic field, and to the east is a parking area with our solar panels tucked onto the north side of the clearing to reduce the shading from the trees. Unlike most of the homes built along the waterfront in our area, we did not clear sightlines towards the water. We currently have a screened view of the water, which actually makes those glimpses out onto the bay more special.

Trees were kept strategically so that the house would be well shaded during the summer season, both from the south, but most especially against the hot afternoon sun out of the west. The best way to accomplish this is with deciduous trees, red oak and sugar maple in our case, so that all through the leafy summer season the house stays as deeply in shade as possible, while in the winter the lack of leaves allows the sunlight to stream right in. The existing larger trees at our site helped to determine where we would set the home so as to best take advantage of that shading.
The rule of thumb that I have read and been told multiple places is that one ought to be within 15 degrees of south to take advantage of passive solar heating, but with our site, we were able to square our house perfectly to the sun. This means that at solar noon1 the sun shines straight into the south windows of the house. This perfect east/west orientation gives a few unexpected benefits. One is that our entire house acts as a sundial; one can simply look at the angle of the shadows cast on the ground as the sun streams in the windows to know the time. Also, on the spring and fall equinox, we get the sunrise and sunset shining all the way across the home through the windows on the east and west sides. I noted this spring that in the downstairs bathroom (at the northeast end of the house), sunsets around the equinox are really the only time that the room gets direct sunlight at all.
Passive solar design principles suggest that a longer east-west axis is used, with windows focused as much as possible to the south side. This allows for the south wall and windows to soak up the winter sun, while minimizing the east and west faces which can heat up excessively in the summer. We doubled down on this logic by making our home a rectangle elongated east to west, with a much taller south face full of windows. At the same time, the north side was banked into a hillside with only a few small windows, as since north windows are always in the shade they constantly lose heat through the winter. We broke only one rule of passive solar design by putting a lot of west facing windows, but this was a worthwhile trade-off to capture the views of the river, and trees provide good summer shade to the west.
With all of the big windows, especially in the upstairs, it certainly has the effect of bringing the outside into our home. The views change with the seasons, with veiled views during the summer and fall due to all the leaves on the trees, with much clearer lines of sight in the winter. This allows us to really soak in the valley and hill to the south, and the river to the west.
In figuring out details about the house, its orientation, and which trees to keep or cut, I spent a lot of time looking at the solar chart shown below. It packs an enormous amount of information into one graph, showing the length of the day, angle of the sun above the horizon and simultaneously its location in the daily east to west motion, and does all of this for every day of the year. With a bit of measurement and calculation, I could imagine how the sun would play across the house throughout the day and across the seasons, and plan for windows, shading, and solar panels.

Accessed from http://www.gaisma.com/en/location/ottawa.html
See their site for a longer explanation of how to read the graph
All in all, we have been very pleased with the siting of our home. I have recently read that there is some doubt as to whether applying passive solar principles is worthwhile in the age of superinsulated homes (see here), but I still wouldn't change a thing. Even though we did a lot to maximize our solar gains, we at the same time were able to meet all of our aesthetic goals, both inside and out.
1 South as measured by the sun is a bit different from magnetic south, and solar noon a bit different from noon on a clock. Solar south is the 'true' south, and corresponds to the point where the sun is exactly half-way across its trajectory across the sky and at its highest point. Solar noon is the time at which the sun reaches that point. At our house, this works out to be at about 12:05 pm local time in the winter, and 1:05 pm in the summer. Your match of solar noon to the clock will depend on where you are located within your time zone.
As a further aside to this footnote, I also need to mention that I had always thought that the 'real' time with daylight savings time was during the summer, probably because I enjoyed the brighter and longer afternoons. But actually, it is the winter clock setting where noon on the clock closely matches with the actual middle of the day as based on the movement of the sun.↩
Thursday, 17 September 2015
Inspiration for our home
This post is a part of the Manitou Hills Project series.
Building a highly efficient 'green' home is something that I thought about for many years before it actually happened. I never formally studied architecture or building science, but I dabbled in researching the topic for a decade. I remember that I was absolutely inspired when I first came across some of the designs for highly efficient homes from the 70's, especially some of the passive solar designs of that time. There were terms like Trombe walls, usage of large water tanks for thermal mass, 'earthships' with greenhouses inside the home, and more. There was a great deal of experimentation going on in building innovative and green homes for the future, with the hope of drastically reducing the amount of energy that it takes to both build and run a home. This experimentation really was necessary, because as I read further, I came across the critiques of all of the things that didn't work, causing things such as mold and massive overheating in the summer. While there were a lot of interesting ideas here, clearly I was going to need further inspiration elsewhere. And I did go on to find further work on passive solar design done much more recently, that has distilled out some of the best design principles to take advantage of that free energy source, the sun.
More recently, I came across Passive House, another green building design philosophy that focused almost exclusively on reducing the amount of energy used in a building (Passivhaus in its original German). By focusing on energy reduction, the building envelope becomes the prime target. Massive amounts of insulation, compact shapes with a minimum of surface area, triple-paned windows, high airtightness, these are the things that allow heating (and air conditioning) loads to go way down, and as I read in multiple places, a house that can be heated by only a hair dryer. As for electrical loads, there are now efficient appliances and mechanical systems that, in conjunction with a well built shell, bring a certified passive house down to roughly 10% of the energy use of a typical home.
The third major strand that we needed to bring together for our project was renewable energy, so that we could build a home that was off of the grid. Unfortunately (or perhaps fortunately depending on your perspective), the property that we fell in love with was very far off the beaten track, so far off that it would have been prohibitively expensive to bring in power lines. It was both going to be cheaper, and much more interesting for me, to build a home that was completely off of the grid. Today is a very exciting time for renewable energy, with solar panels dropping precipitously in price, new types of batteries just becoming available that are more powerful and reliable, as well as less expensive than those that came before. I am not alone in thinking that renewable energy is the future, and it is quite a ride to see that future arriving and to be a part of it.
Finally, there was the architectural style to consider. It is possible to build an efficient home in any style that allows for a relatively compact building shape, and I was drawn in particular to some of the contemporary styles. I have seen a certain style of home described in some places as "contemporary mountain" that have stylistic elements that we drew from, including a single pitched shed roof, deep overhangs, use of lots of larger dimension wood, and a close alignment to natural surroundings. My impression is that this style is currently most popular in the Pacific Northwest. I'd say that the single home that provided the greatest inspiration for style came from Nils Finne of Finne Architects, and a home that he built on the shore of Lake Superior.
Subscribe to:
Posts (Atom)